Role-Based Access Control
Role-Based Access Control
Tesseral adds Role-Based Access Control (RBAC) support to your product
Role-Based Access Control (“RBAC”) is the most common pattern for managing user permissions in B2B applications. When you use Tesseral, most of the work of supporting RBAC is done automatically for you.
What is Role-Based Access Control?
The idea of Role-Based Access Control (“RBAC”) is to introduce a notion of Roles in your product, which Users can be assigned to. A User’s permissions are based on the Roles they have.
When you use Tesseral, you’ll implement RBAC by following these steps:
-
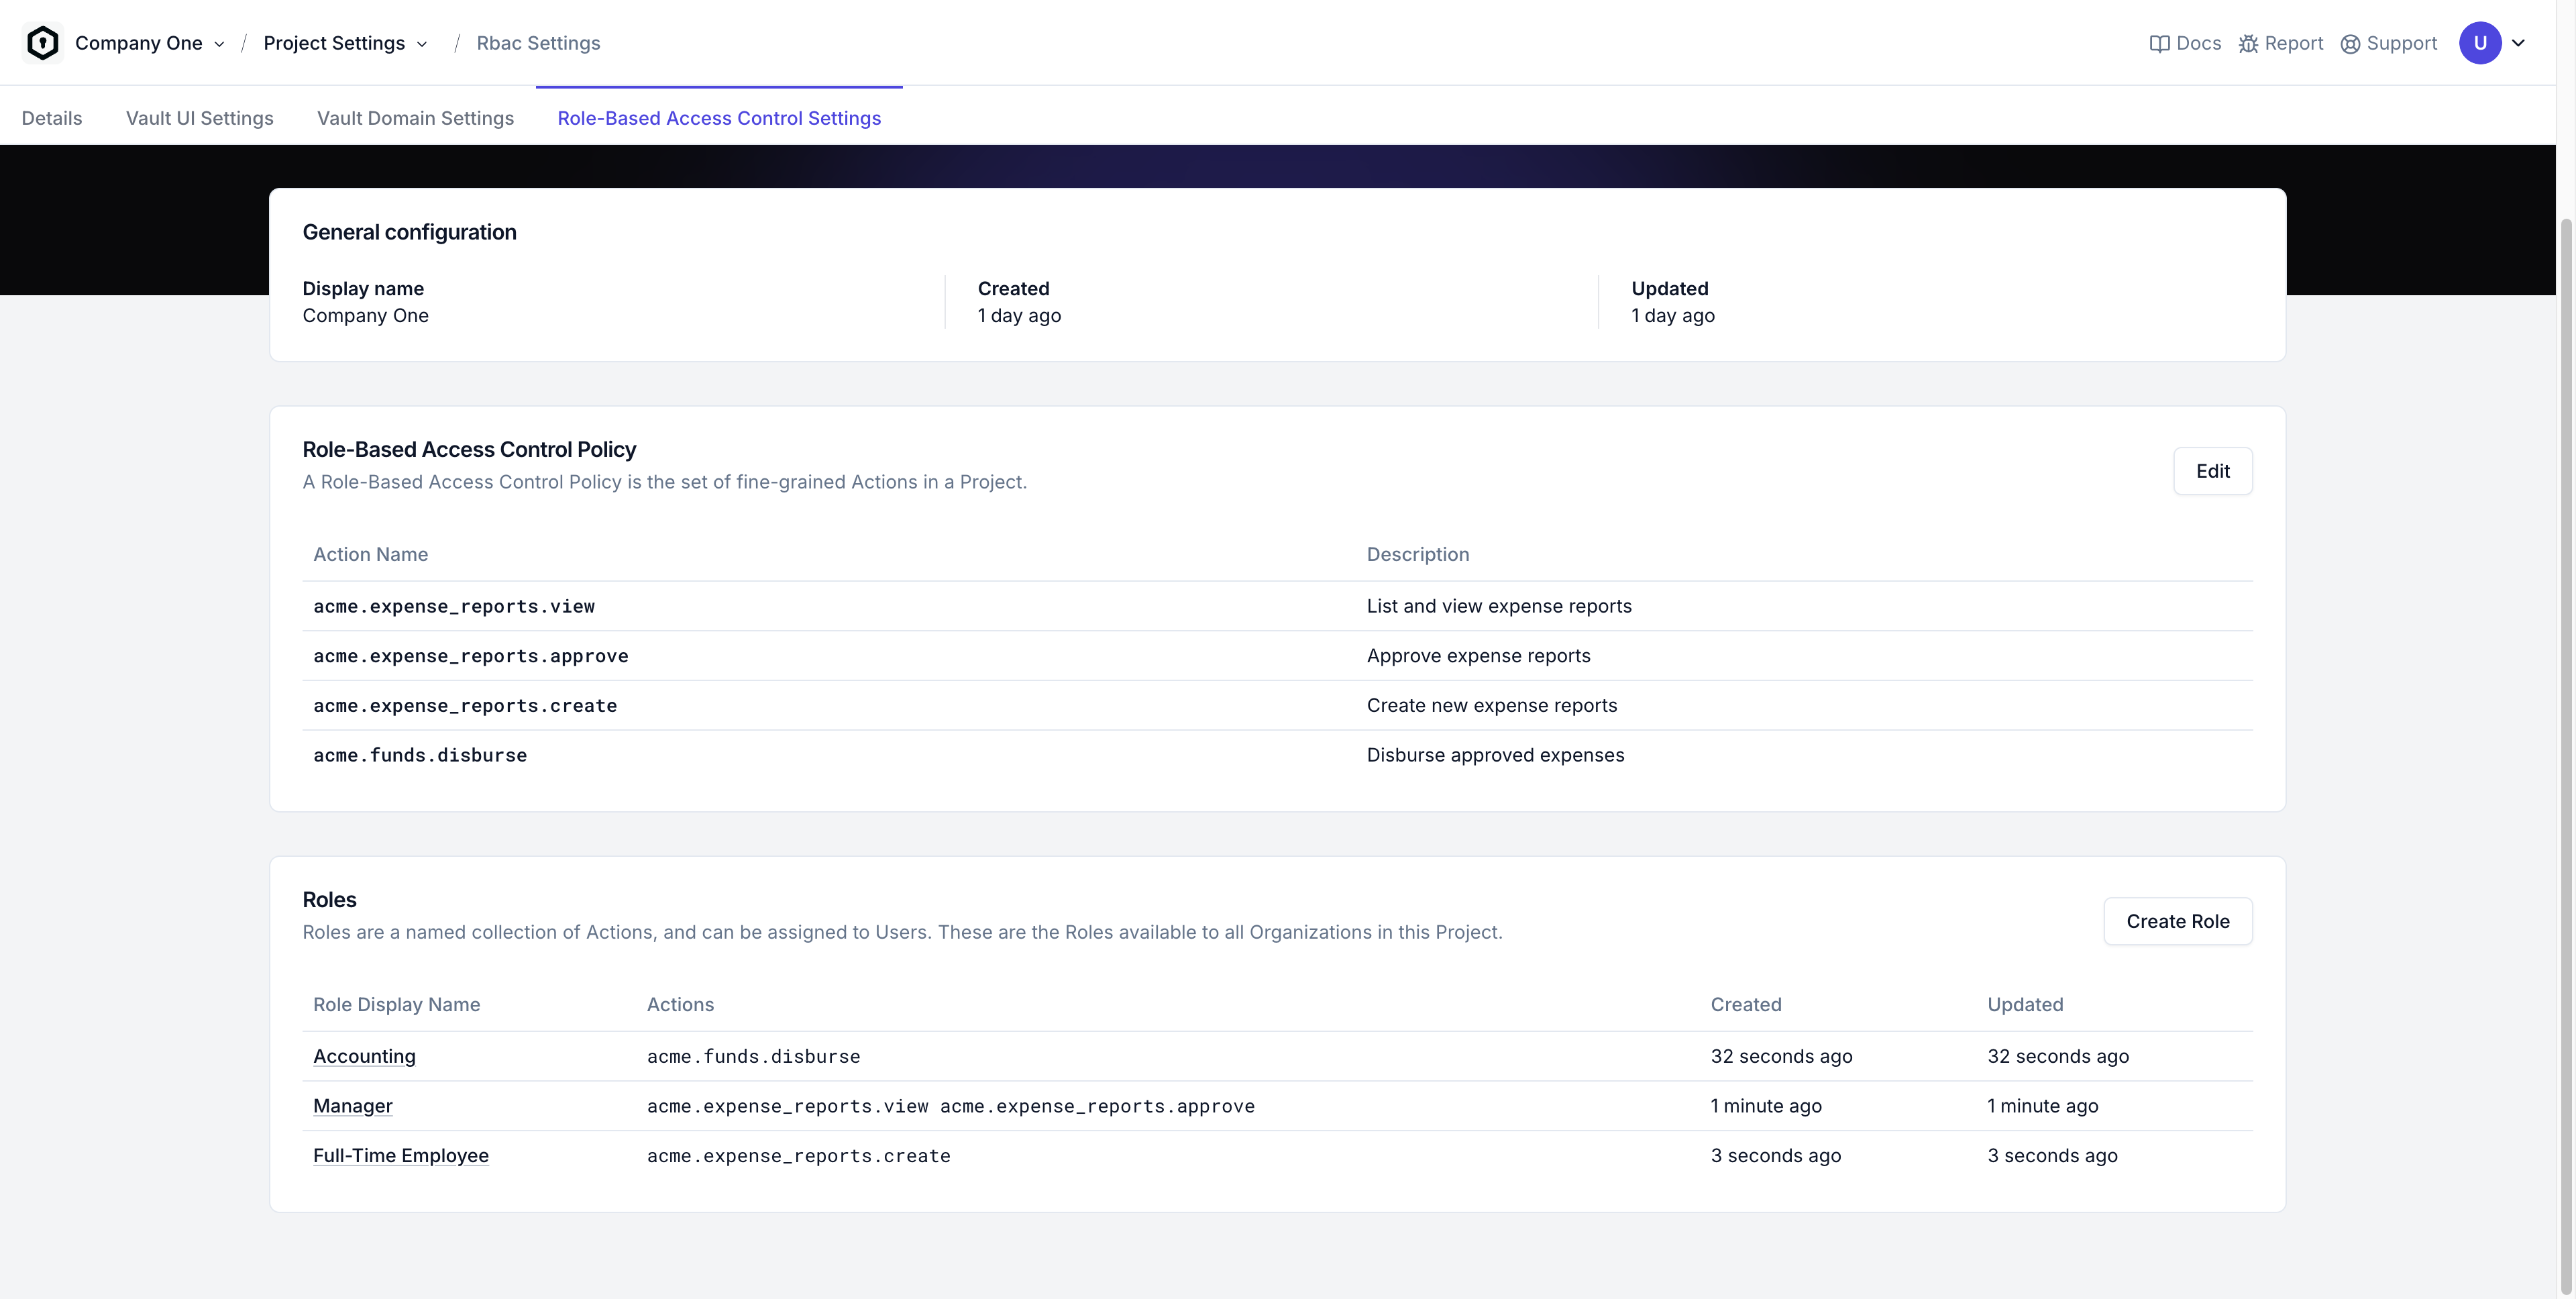
Identify each of the specific fine-grained Actions in your product. This step is always specific to your product.
For example, if you were making an expense management product, your product’s Actions might be “creating expense reports”, “approve expense reports”, and “disburse funds”.
When checking permissions, you’ll need to refer to those fine-grained Actions from within your code. So Actions have both a human-facing description (e.g. “View and approve expense reports”) and a code-facing name (e.g.
acme.expense_reports.approve). -
Give all of your customers a set of Roles they can assign their Users to. Those Roles are going to be specific to your product, but usually map roughly onto a job title or department.
For example, an expense management product might have a “Manager” role that has the
acme.expense_reports.approveAction, and an “Accountant” role that has theacme.funds.disburseAction. -
Your customers assign employees to Roles through their Self-Serve Organization Settings. You don’t need to write any frontend or backend code related to assigning Users to Roles.
When onboarding or providing support to customers, you can also assign Users to Roles through the Tesseral Console on behalf of your customers.
-
Whenever your code needs to check if a User has permission to do something, you always check whether the User has a given fine-grained action. See “Permission Checks” below for the exact code you’ll write.
As you grow, you’ll eventually encounter customers who want Roles beyond the set you defined in step (2). To accommodate this, you’ll allow those customers to use Custom Roles.
RBAC Concepts
Actions
An Action represents a fine-grained permission in your product. Every Action consists of:
-
A code Name, such as
acme.expense_reports.approve.You should name your Actions in the form “service.resource.verb”. Until your product becomes large enough that you have multiple product lines, you should just use the name of your product as the “service”.
For example, if your company is called ACME Corporation, and you want to represent the permission of being able to edit widgets, you might choose the name
acme.widgets.edit.Action names must be of the form “x.y.z”, where “x”, “y”, and “z” are all lowercase alphanumeric or underscore (
_). -
A description, that humans can use to understand what the Action bestows.
For example, the description for an
acme.expense_reports.approveAction might be “Approve and reject expense reports”.
RBAC Policy
Every Tesseral Project has exactly one RBAC Policy. An RBAC Policy is just a list of Actions.
You can add or remove Actions to your Project’s RBAC Policy at any time. Deleting an Action removes that Action from every Role in the Project.
Roles
A Role represents a category of User in your product. They usually roughly correspond to job titles. Every Role consists of:
- A set of Actions, such as
acme.expense_reports.approve. - A display name, such as “Manager”.
- An optional description.
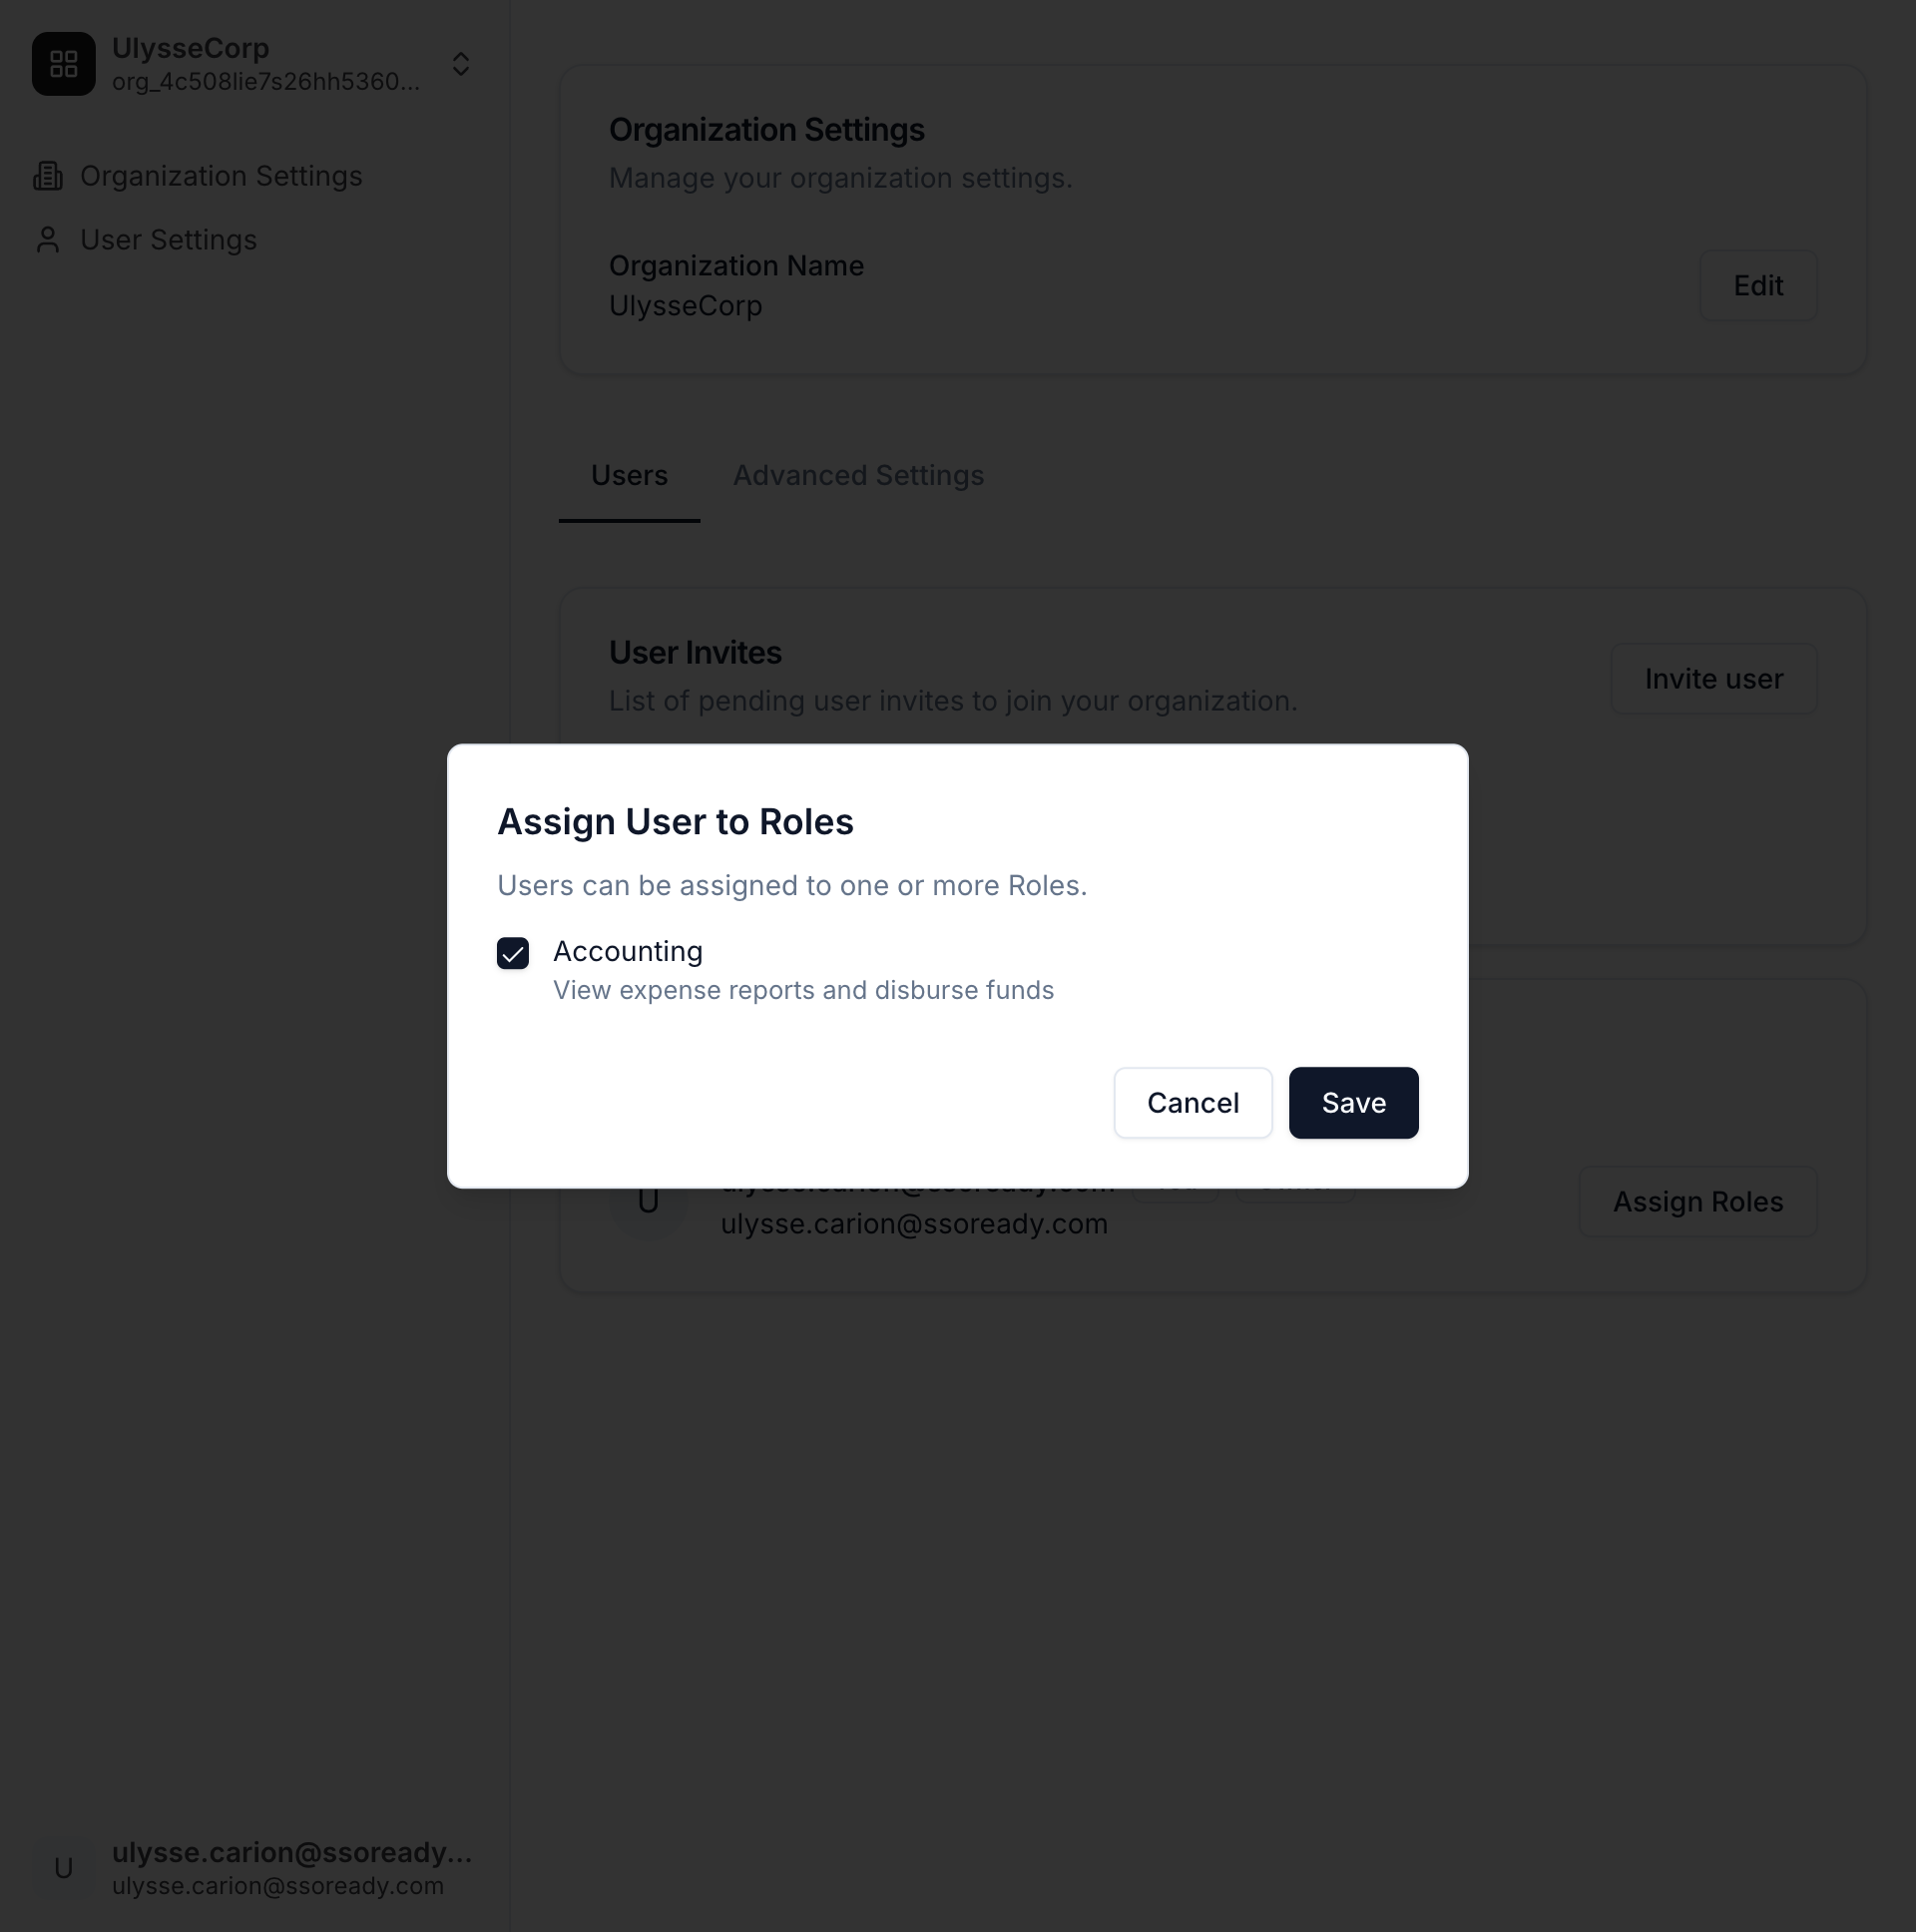
Users can be assigned to Roles. There is no limit to how many Users can be assigned to a Role, nor on how many Roles a User may be assigned to.
Roles can either be Project-wide or Organization-specific.
-
Project-wide Roles are available to all Organizations in the Project, and can only be modified through the Tesseral Console or the Tesseral Backend API.
-
Organization-specific Roles are custom Roles. They can be modified through the Tesseral Console, the Tesseral Backend API, or by the Owners of the Organization they belong to.
Permission Checks
All of Tesseral’s client-side and server-side SDKs give you a straightforward function for checking a User’s permissions.
React
Express.js
Flask
FastAPI
Go
Axum
These instructions assume you’ve already set up Tesseral for React.
Any time you need to check whether the current User is allowed to perform an
action, use useHasPermission:
The function returned by hasPermission is fast and not resource intensive. You
can typically call it as often as you like with negligible performance impact.
Custom Roles
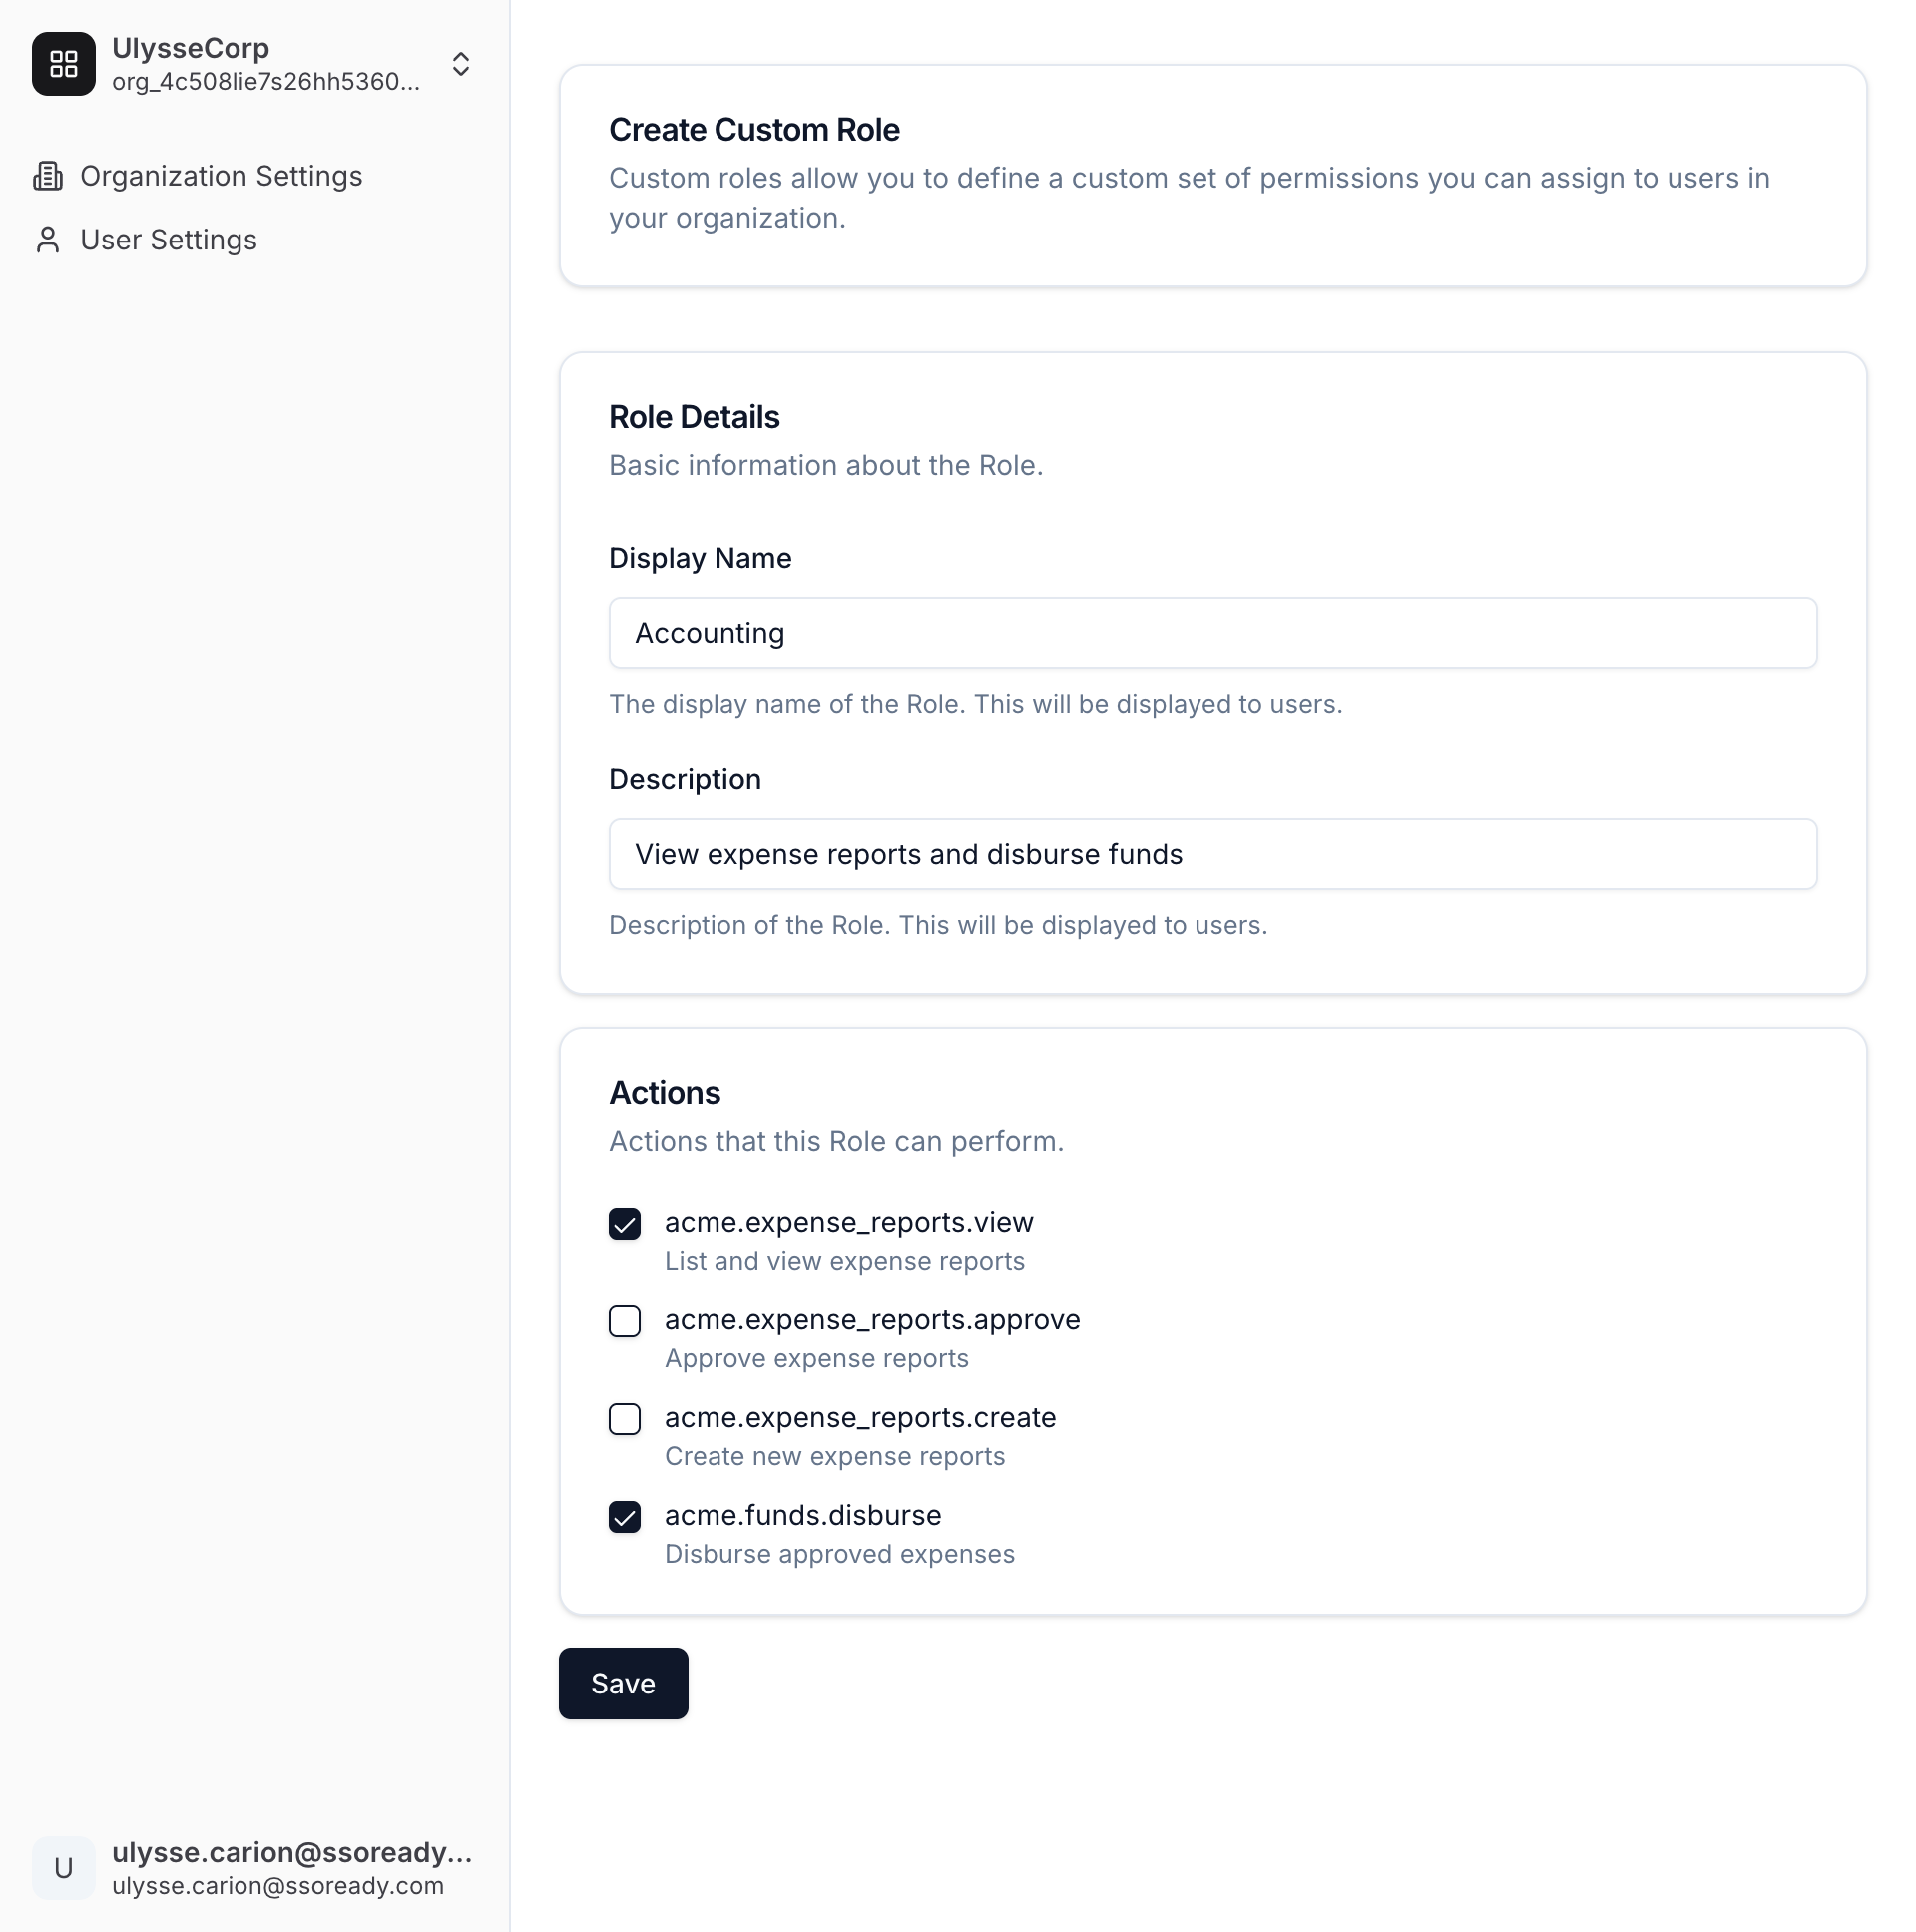
Having too many Roles is overwhelming and confusing to customers, but some customers will want very specific sets of actions available to certain employees. These kinds of requests often come from your largest customers.
To address this, use custom Roles. Give all of your customers a general set of actions that are broadly useful, and then grant specific Organizations the ability to define Roles that only they see. Custom Roles work just like ordinary Roles — they have display names, descriptions, and a set of Actions — but they only exist for a single Organization.
Your permission checks will work exactly the same regardless of whether a Role is Organization-specific or not. You do not need to write or modify any code to support custom Roles.
When custom Roles are enabled for an Organization, your customer can create and modify their custom Roles from their self-serve Organization settings. You can also create and modify custom Roles on your customer’s behalf from the Tesseral Console.
Enabling Custom Roles
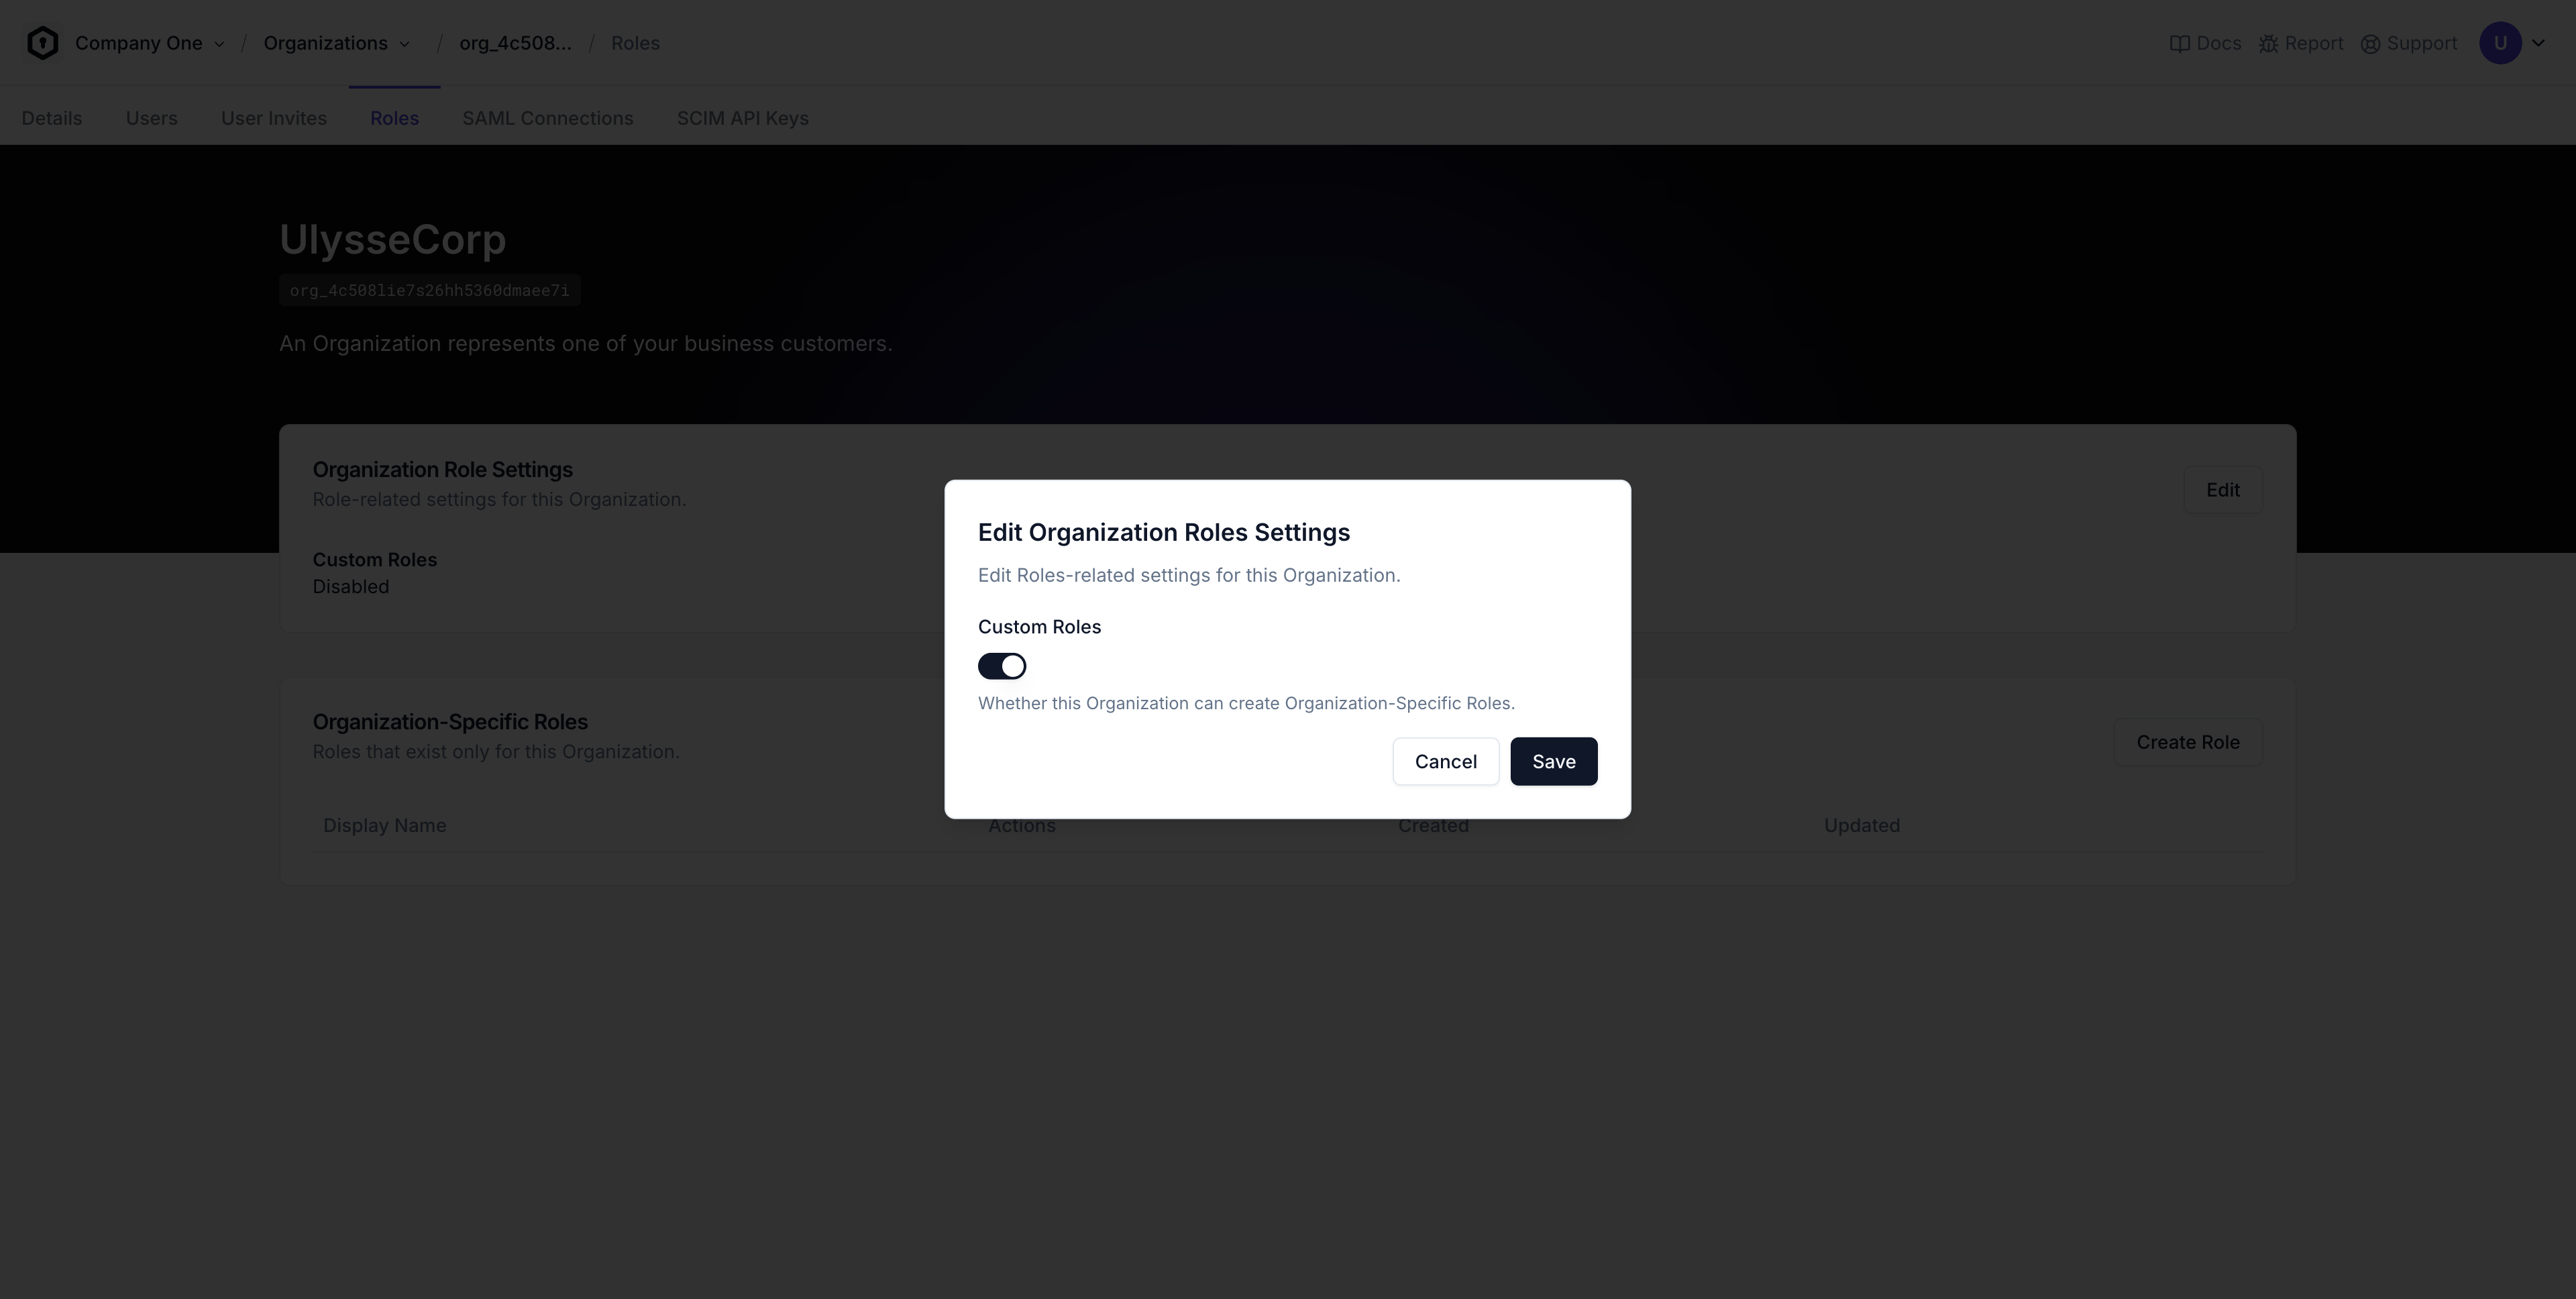
By default, Organizations in your Project cannot create custom Roles. You must enable Custom Roles on an Organization to add this functionality.
Custom Roles are not enabled by default because some customers may find them confusing, and because you may want to charge your customers for access to this functionality.
Handling edge cases
You don’t need to implement every kind of permission check using RBAC. It’s normal to augment RBAC with additional logic for certain use-cases.
Role-Based Access Control is the standard approach in B2B for most business logic, but it’s entirely normal for parts of your product to rely on additional logic not captured entirely within RBAC:
-
Some parts of your product might be gated behind payment. These kinds of billing-related permission checks are most often called “entitlements”, and rely on an integration between your backend and your company’s CRM (e.g. Salesforce, HubSpot) or payments system (e.g. Stripe).
It’s normal for your backend to perform both an RBAC check and an entitlement check on endpoints. On your frontend, it’s helpful to know whether a request was denied from an entitlement vs RBAC, because you can show your customer an upsell (e.g. “Upgrade to Pro” or “Talk to Sales”) when the issue is with entitlements.
-
Some parts of your product might require custom permissions logic for specific actions. Your product might have notions of “assignees”, “collaborators”, or otherwise unique and complex resource hierarchies.
It’s normal for your backend to rely on both RBAC and your custom business logic to make authorization decisions in these cases. This approach gives you the ability to give your customers specific and relevant options when they run into permissions errors.
The unifying theme here is that you don’t need to solve all of your permissions problems with a single system. Some parts of your permissions model are intrinsic to your product, and part of what makes it unique. When those situations arise, you can use RBAC as a part of a broader solution.